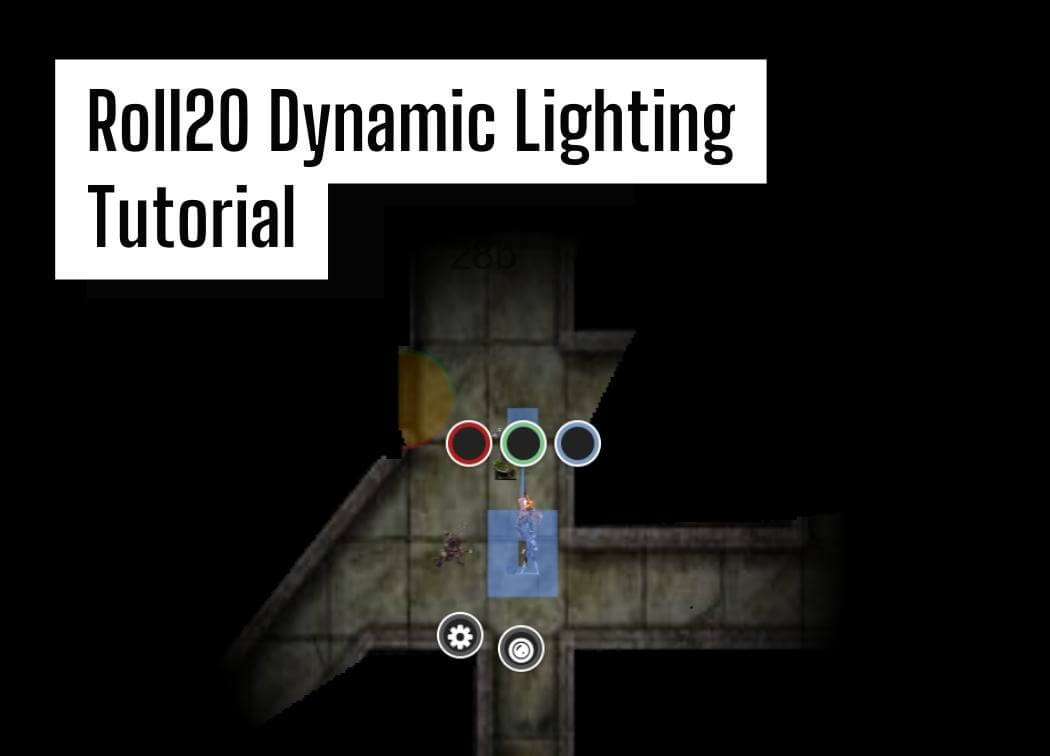
Roll20 Dynamic Lighting Tutorial
I’ve mentioned how Roll20 has enhanced my tabletop experience for me and my friends recently in my music in RPGs post. However, that is only one of the many great perks of using Roll20. My favorite, by far, is the dynamic lighting feature.
In this post, I’m going to teach you how to use dynamic lighting to enhance your own games on Roll20 and add another layer of depth to the players’ environment.
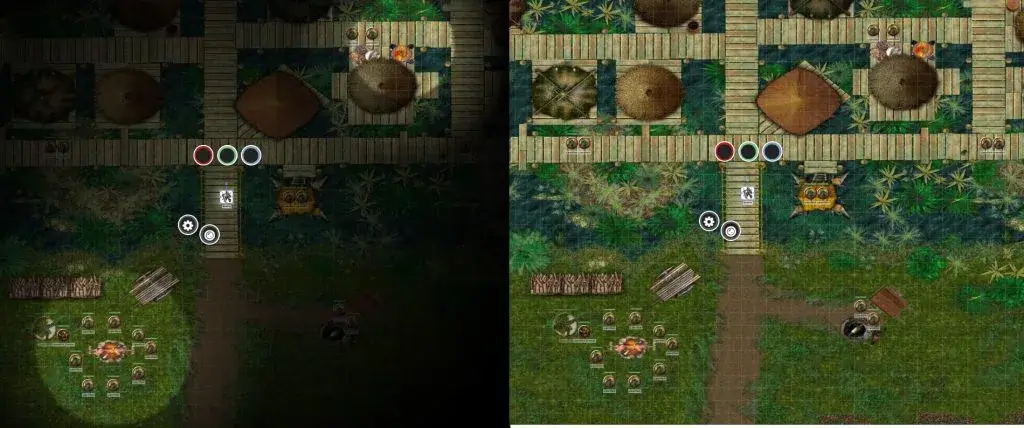
As you can see in the comparison picture above, dynamic lighting allows the GM to illuminate the map and control what the players see. In certain tabletop games, this is a mechanic, for example, D&D 5e with its Darkvision mechanic. Other games that I play such as Apocalypse World, still benefit from giving the players a more realistic view of the world. If it’s night-time, they won’t be able to see the entire map.
What You’ll Need
Extra Time
There is a learning curve for dynamic lighting. It took me a few maps and dungeons to understand how the feature worked. In addition, this will add at least 10 min of extra time to each map you create in Roll20 depending on the size and complexity of the map. If you have torches or light sources you’d like to add to the map it will take some time to set everything up. The payoff is worth it, but it does take up a solid chunk of time.
Subscription
The dynamic lighting feature is one of the few features that are not included for free in Roll20. You will need either a Plus or a Pro Account subscription. These are roughly $5 and $10 a month, respectively, and come with a ton of other extras included. Dynamic lighting alone makes the Plus account absolutely worth the $5 a month in my opinion.
Lighting & Line of Sight Rules
Have the rules for darkness and line of sight handy when you add dynamic lighting to your maps. You’ll want to know how many feet/meters the characters and enemies can see. This will vary between game systems so be sure to have concrete rules ready for when you create your maps.
Configuring Your Map’s Settings
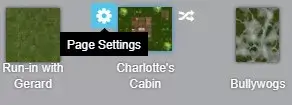
Before we begin, we’ll need to enable the use of dynamic lighting and line of sight in the map that we want to add our lighting to. Open up the Roll20 game that you are a game master of and click the maps tab. Click the cog-wheel to access the page settings for the map you wish you add dynamic lighting to. See the picture above this paragraph for reference.
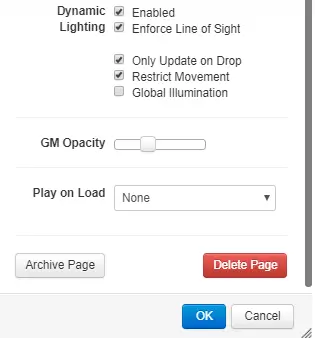
A pop-up of the page settings will then appear once the settings icon is clicked. Scroll down to the “Dynamic Lighting” section of the settings. You will need to at least have the “Enabled” option selected in order to use dynamic lighting. You should also select “Enforce Line of Sight” as it prevents players from seeing lighting on the opposite side of a wall they’re standing near.
Optional Dynamic Lighting Settings
- Only Update on Drop: If a player clicks and drags their character token, their token’s vision will not be updated until the token is placed down in a new square.
- Restrict Movement: Tokens cannot move through the dynamic lighting boundaries.
- Global Illumination: The map is fully lit, but line of sight is still enabled. For example, players cannot see behind walls that are drawn.
Now that you have selected which settings you desire for this map, we can move on to creating the dynamic lighting layer.
The Dynamic Lighting Layer
Once you have selected your settings, you’ll have to go into the dynamic lighting layer to begin adding lighting to the map.
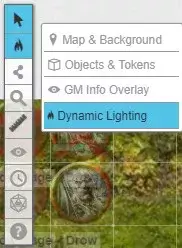
The elements of any map in Roll20 can be given special properties by placing them in a specific layer. Dynamic lighting is no exception to this. Go to the layer selection tool on your toolbar and click the “Dynamic Lighting” layer to begin creating your lighting. The picture above shows how to select a layer in Roll20.
To add dynamic lighting you’ll then use the “Draw Polygon/Line” tool to add walls and other barriers that affect the way a token’s vision or lighting. I will go into the specific technique of doing this in the next section.

The picture above is of a finished dynamic lighting layer for a map. Personally, I prefer to use two different, bright colors that stand-out for my dynamic lighting. It helps me so I used yellow lines to outline the walls of the catacombs I created in the map. I used red lines for the doors to help me distinguish between the two. Sometimes I will make the doors a larger size line than the walls to help me distinguish between doors and walls.
If you selected the “Restrict Movement” option, you’ll have to go into this layer during your games in order to move your door markers.
Adding Dynamic Lighting to the Map
Before you begin, ensure that you are currently in the dynamic lighting layer of your map. Otherwise, you will be drawing randomly colored lines all over the map!
Step 1: Select the Polygon/Line tool

First thing’s first, you’ll want to select the proper tool for the job. In this case, the polygon/line tool is your best option. You can use the draw shape tool as well, but I find the polygon/line tool is considerably easier to draw with.
I recommend changing the color of the line from the default black color as that can be extremely hard to see on some maps. You’ll want to be able to see your lines to ensure that you have no missing spaces in your dynamic lighting layer. Choose a different color and/or size for your doors, windows, and other entrances that you will need to move around during the game.
Step 2: Add a line

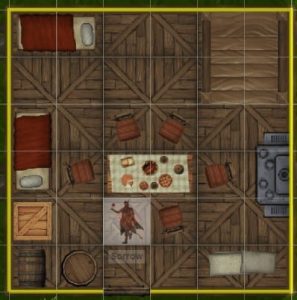
For this tutorial, we are going to draw the dynamic lighting layer of a small cabin in the woods. This cabin only has 1 door that will be opened/closed during the game.
Begin with drawing a simple line. Click on the starting point, this case the left-hand side of the door, and then click on a second point to create a single line.
Since the cabin is to scale with the map squares we can use Shift+Click to snap the line directly to the grid. This makes for neat and organized lines with very little margin for missing spaces or holes in our dynamic lighting layer.
Step 3: Draw the Perimeter
Now we will continue to create line segments by holding Shift and clicking the corners of the cabin. In other drawings you may not want to have perfectly straight borders. In these cases don’t hold Shift, but continue to click to create crooked lines. We’ll stop on the opposite side of the door from where we started creating a space for the door.
There are two ways to complete a drawing in the dynamic lighting layer. The first is to complete a shape by clicking the starting point of the drawing. The other is to simply right-click anywhere on the map. Either way be sure to do one of these two things so that you do not unintentionally continue your drawing from your last point.
Step 4: Draw Doors & Windows
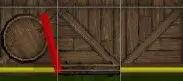
Lastly, add in any doors and windows that are able to be opened by the players. Use a different color and/or thicker line size to help differentiate between your perimeter and the door/window. As I mentioned earlier, this helps you when you need to move these boundaries for the players during the game.
Now that the cabin is completed let’s configure tokens for any light sources, creatures, or players that will be interacting with the map.
Configuring the Tokens
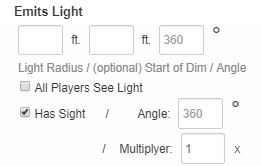
Your map now has boundaries for the dynamic lighting. Next, we will have to enable our players’ tokens sight settings and add in any light sources to our map. To access these settings, double-click the desired token and select the “Advanced” tab.
Unless you check the “Has Sight” option the player can only see pitch blackness. Has Sight allows the player to see any lighting that is on the map, or have their normal vision if you selected the “Global Illumination” setting.
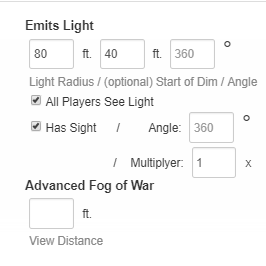
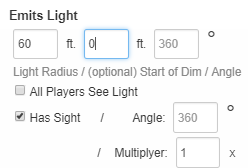
The settings in the picture above is for Fribavu, a Monk with Flame Tongue (Short Sword). When lit, the sword illuminates a total radius of 80 ft. with 40 ft. of that being dim. The first box is the total light radius and the second is where the dim light radius begins. The third form is the angle of the light, but that is not applicable in this scenario.
The “All Players See Light” option is selected because the sword is lit. When this is selected, all tokens are able to see the light radius on the map if they are in line of sight. There are other light options such as “Angle” which limits the token’s sight to a portion of its normal radius. The “Multiplyer” option multiplies the token’s light radius by the value you’ve specified.
D&D 5e Options
The Finished Product
Now that we’ve added our dynamic lighting layer, our token’s sight, and any light sources to our map, let’s look at the results!
Inside of the Cabin
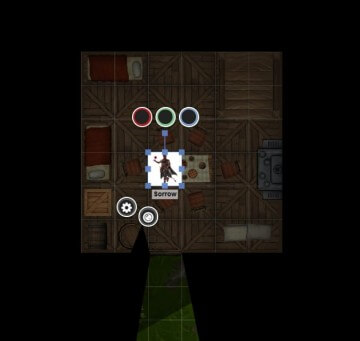
There are no light sources lit inside of the cabin, but Sorrow has darkvision so he is still able to see. The black areas are past the boundaries we drew. Sorrow is not able to see past these as we have enabled Line of Sight.
Outside of the Cabin
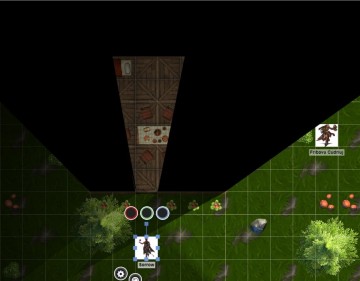
Here is how the lighting looks outside of the cabin. The black areas are what is obscured from Sorrow’s line of sight, or is too far away for sorrow to see. The dim areas are where Sorrow is able to see due to darkvision. The lit area is due to Fribavu’s Flame Tongue which gives off both bright light and dim light. If sorrow did not have darkvision, he would only be able to see what Flame Tongue was illuminating.
Conclusions
I love the dynamic lighting feature in Roll20. The first time I used it both my players and I knew that it was a game-changer for us. We’ve certainly noticed the effect it has when it is missing in Roll20 games. Dynamic lighting adds another layer of depth and strategy to any RPG as players will have to plan around what they may be unable to see.
Dynamic lighting has helped with an issue I used to have in my games. My players would constantly run ahead or move their tokens around the map quickly. This would unintentionally reveal things I had wanted to keep a secret, or made the game-flow a lot less organized. By adding dynamic lighting to doors and toggling on the Restrict Movement feature the players are forced to stay within the boundaries I set.
I also have added this to the enemy tokens I control when I am GMing. It gives me a way to ensure that the party is in line-of-sight for things like ranged attacks and abilities. It adds a lot of realism to my games because of this.
As I’ve said before, it does take a bit of extra time to add dynamic lighting to your maps, especially when you are learning. Regardless, I would highly recommend grabbing a Roll20 subscription and trying it out for yourself. You will find a huge difference in your game for just a bit more time added to your planning.